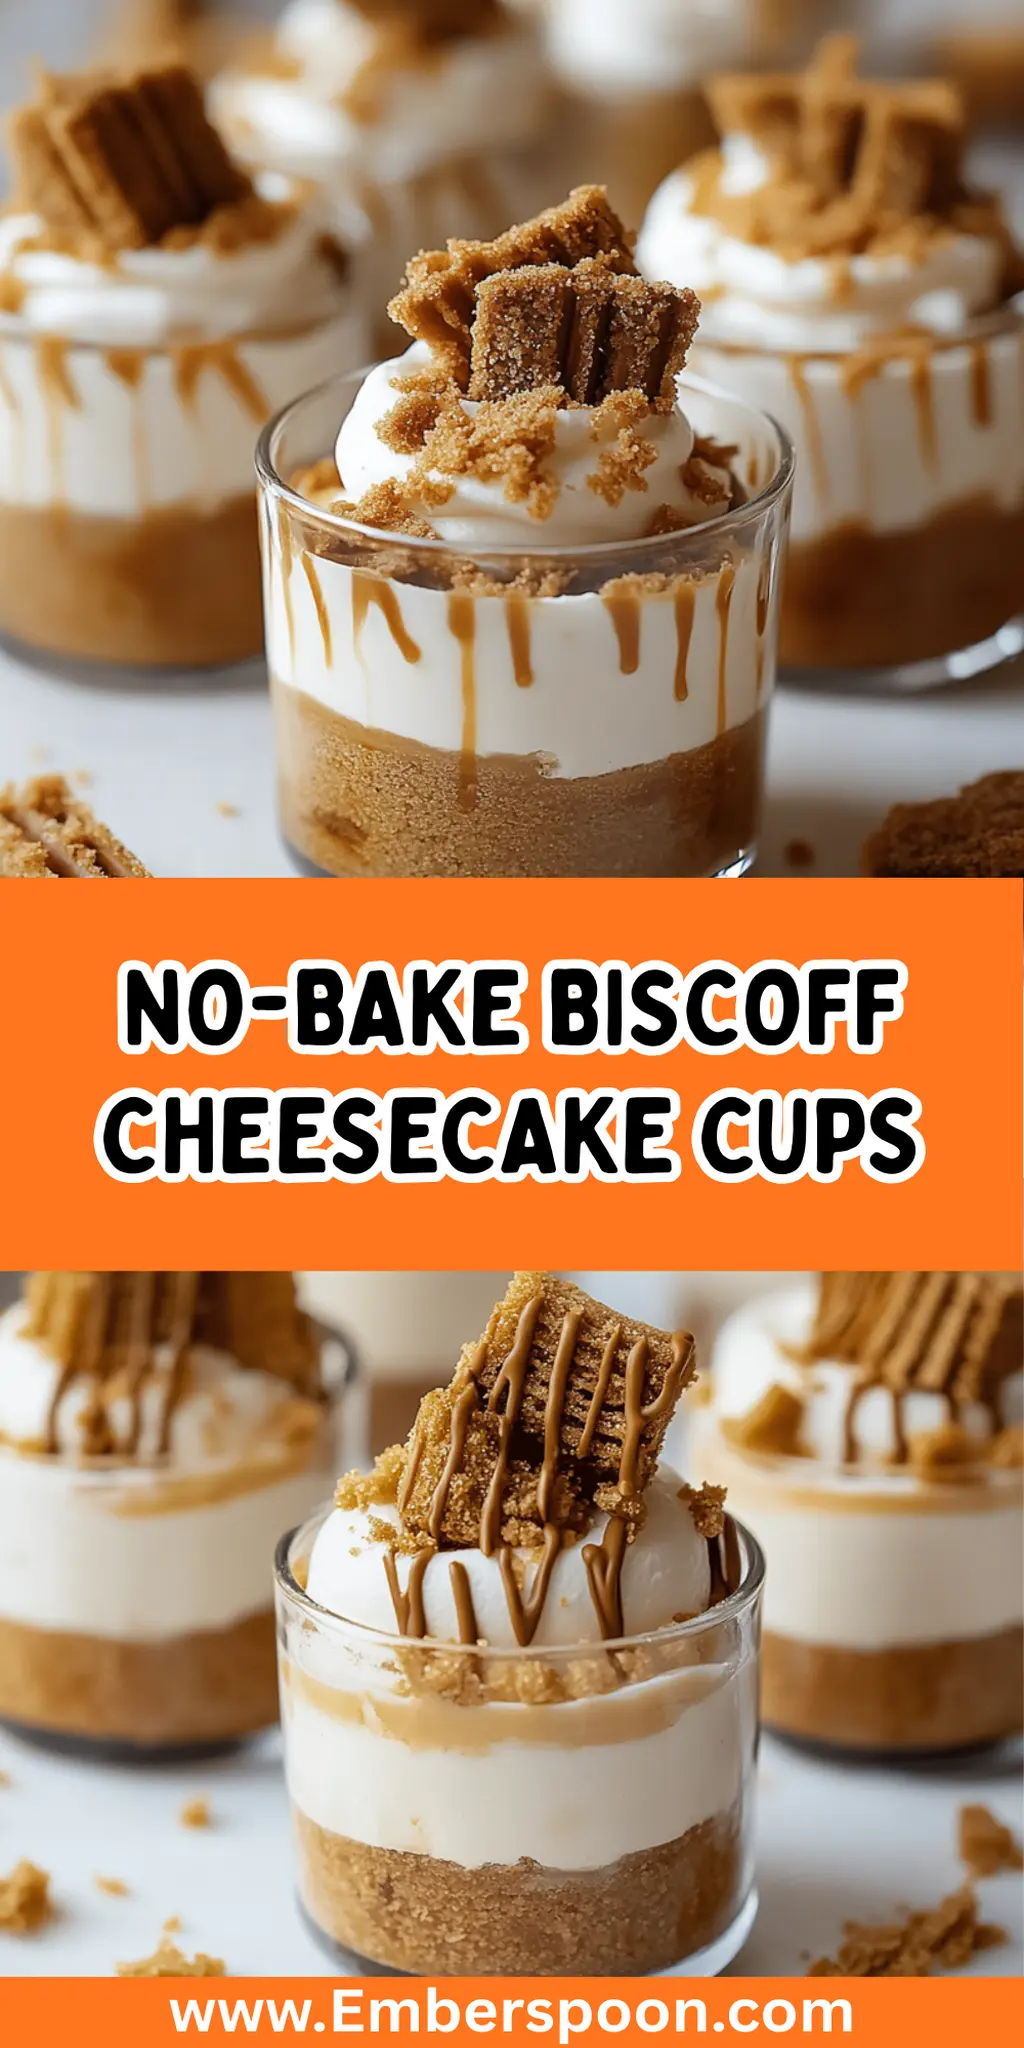
There’s a special joy in crafting desserts that not only please the eye but also delight the taste buds. When I first tasted a Biscoff cookie, I was swept away by its unique caramel flavor and delightful crunch, and I knew it had to shine in a special dessert. That’s how my No-Bake Biscoff Cheesecake Cups were born—a happy accident that transformed a moment of indulgence into a fabulous, no-fuss delight.
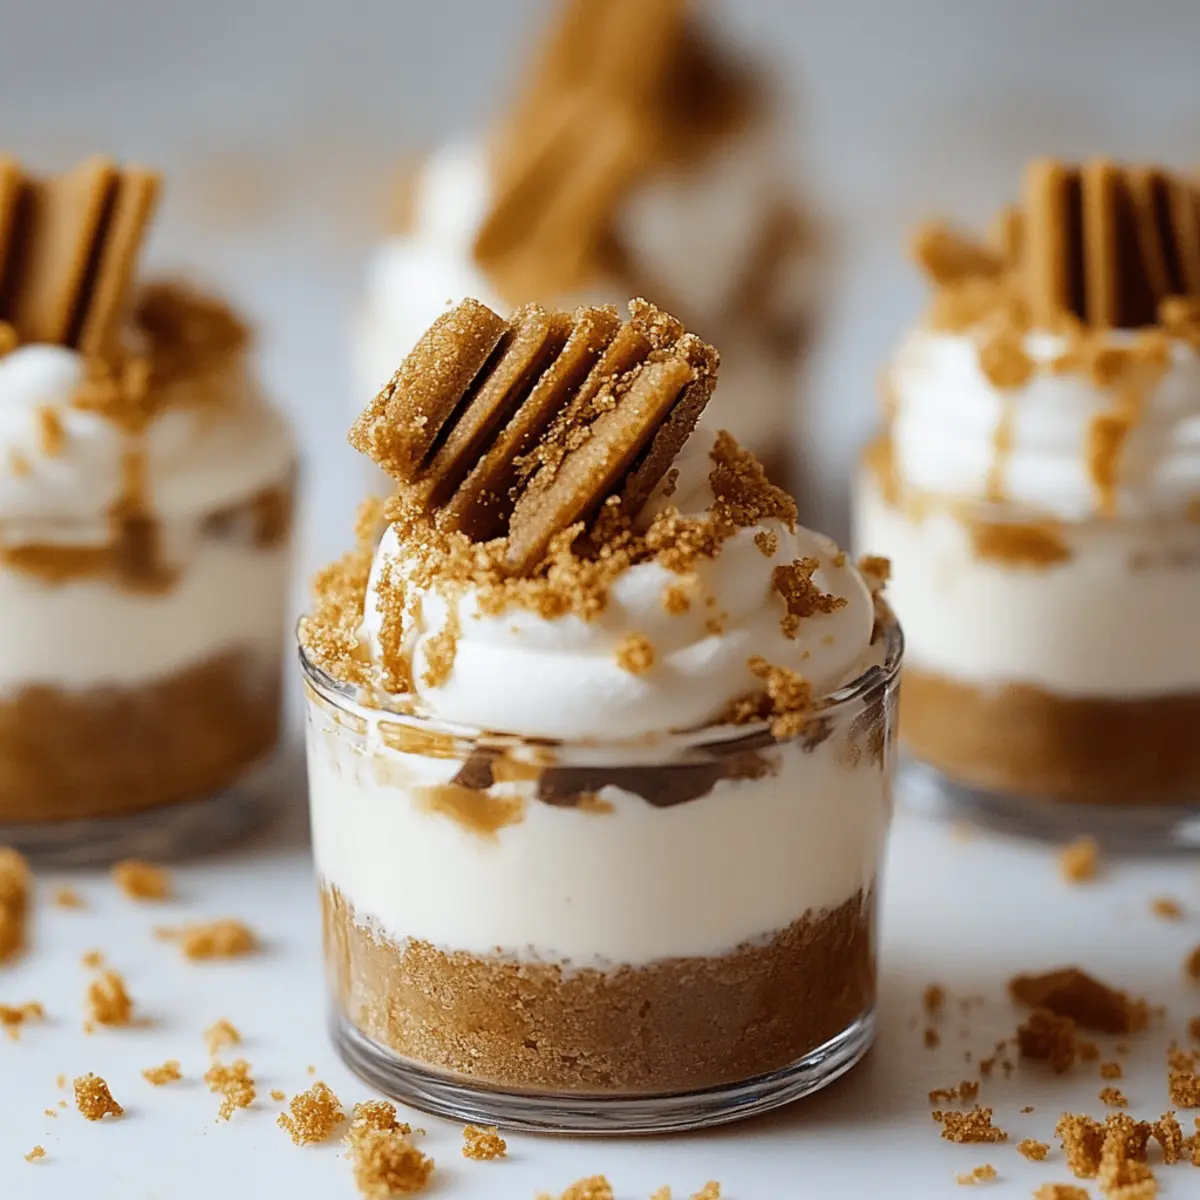
Perfect for those warm evenings when turning on the oven feels like a chore, this recipe is as simple as it is luscious. With velvety cream cheese blended seamlessly with that iconic Biscoff spread, every bite transports you to dessert paradise. Plus, the layers of cookie crust bring just the right amount of textural contrast, making these cups a hit among friends and family alike.
Whether you’re looking to impress at your next gathering or satisfy a sweet craving, these No-Bake Biscoff Cheesecake Cups are a recipe I can’t wait for you to try!
Why You'll Love This No-Bake Biscoff Cheesecake Cups
- These No-Bake Biscoff Cheesecake Cups are incredibly easy to make, requiring just 15 minutes of prep time before they set in the fridge.
- The rich and creamy flavor, combined with the unique taste of Biscoff cookies, will leave your taste buds dancing with joy.
- They’re versatile enough to serve at any occasion, whether it’s a casual family dinner or an elegant gathering.
- Visually stunning and perfectly portioned, these cups are guaranteed to impress your guests and have them coming back for seconds.
- Enjoy the delightful combination of creamy cheesecake and crunchy cookie layers—all without the need for baking!
No-Bake Biscoff Cheesecake Cups Ingredients
• Delight in the simplicity of homemade bliss!
For the Cookie Crust
- Biscoff cookies – a deliciously sweet base that brings a lovely caramel flavor.
- Unsalted butter – helps bind the cookie crumbs together for a sturdy crust.
For the Cheesecake Filling
- Cream cheese – provides the smooth, rich base that makes this cheesecake delightful.
- Powdered sugar – sweetens the mixture without the grit of granulated sugar.
- Vanilla extract – adds a hint of warmth and depth to the cheesecake flavor.
- Heavy cream – whipped to perfection creates a light and fluffy texture in the filling.
- Biscoff spread – enhances the Biscoff flavor, making this a true No-Bake Biscoff Cheesecake Cups creation.
For the Topping
- Extra Biscoff cookies – crushed for a crunchy topping that complements the creamy filling.
- Chocolate shavings or caramel sauce – optional garnishes that elevate these cups to the next level of indulgence!
How to Make No-Bake Biscoff Cheesecake Cups
-
Crush the Cookies: In a bowl, crush the Biscoff cookies into fine crumbs. This creates the perfect base for your cheesecake cups—aim for a texture that resembles sand.
-
Mix Butter: Add the melted butter to the cookie crumbs and mix until well combined. The mixture should hold together when pressed; this is your delicious crust!
-
Form the Crust: Spoon about 2 tablespoons of the cookie mixture into the bottom of each serving cup or glass. Press down gently to form a crust layer, ensuring it’s compact for stability.
-
Beat Cream Cheese: In a mixing bowl, beat the softened cream cheese until smooth and creamy. This is the foundation of your luscious cheesecake filling!
-
Add Sweeteners: Gradually add the powdered sugar and vanilla extract, mixing until fully combined. The mixture will become lighter and sweeter—just the way we like it!
-
Whip Cream: In a separate bowl, whip the heavy cream until stiff peaks form. This step will give your cheesecake that airy texture we all crave.
-
Combine Mixtures: Gently fold the whipped cream into the cream cheese mixture until well combined, then fold in the Biscoff spread. This creates a rich, creamy filling that bursts with flavor!
-
Fill the Cups: Spoon the cheesecake filling over the cookie crust in each cup, filling them about 3/4 full. Leave some space for the topping!
-
Add Topping: If desired, sprinkle another layer of crushed Biscoff cookies on top of the cheesecake filling. This adds both flavor and crunch!
-
Chill: Cover the cups with plastic wrap or lids and refrigerate for at least 4 hours or until set. Patience is key, as this step ensures a perfect texture.
-
Garnish Before Serving: Before serving, top with additional crushed Biscoff cookies and drizzle with chocolate shavings or caramel sauce if desired. It makes these cups truly irresistible!
-
Serve & Enjoy: Serve chilled and enjoy the creamy, delicious flavors of these cheesecake cups! Every bite is a taste of delight.
Optional: Drizzle with extra caramel sauce for added indulgence!
Exact quantities are listed in the recipe card below.
Make Ahead Options
These No-Bake Biscoff Cheesecake Cups are perfect for meal prep enthusiasts looking to save time on busy weeknights! You can prepare the cookie crust and cheesecake filling up to 24 hours in advance, simply store each component separately in the refrigerator to maintain freshness. When you’re ready to serve, just fill the cups with the cheesecake mixture and allow them to set for at least 4 hours before enjoying. If you want to add a bit of flair, consider sprinkling the crushed Biscoff cookies and drizzling caramel sauce just before serving for that extra special touch. With this make-ahead approach, you’ll have a delicious, impressive dessert ready with minimal effort!
No-Bake Biscoff Cheesecake Cups Variations
Let your creativity shine when making these delightful cheesecake cups!
-
Gluten-Free: Swap Biscoff cookies for gluten-free cookies to accommodate dietary restrictions without compromising the flavor. You won’t lose that heavenly crunch!
-
Nutty Twist: Add 1/4 cup chopped walnuts or pecans into the crust for a delightful nutty flavor and extra texture. The richness of the nuts elevates the experience!
-
Chocolate Lovers: Fold in 1/4 cup of mini chocolate chips into the cheesecake filling for a chocolatey surprise. Every bite will be a blissful fusion of flavors!
-
Vegan-Friendly: Use vegan cream cheese and coconut cream in place of heavy cream to create a delicious plant-based dessert that’s just as creamy and satisfying.
-
Tropical Flair: Incorporate 1/2 cup of crushed pineapple into the cheesecake filling for a refreshing tropical twist. Imagine each spoonful transporting you to a sunny beach!
-
Spicy Kick: Add a dash of cinnamon or a pinch of cayenne pepper to the filling for a surprising hint of warmth. This will tantalize your taste buds in an unexpected way!
-
Fruit Fusion: Top with fresh berries or banana slices for a fruity contrast that adds both color and a burst of flavor. The juiciness of the fruit perfectly complements the creamy filling!
-
Caffeine Fix: Blend in a teaspoon of espresso powder into the filling for a caffeinated boost that enhances the dessert’s overall richness. Perfect for coffee lovers!
How to Store and Freeze No-Bake Biscoff Cheesecake Cups
Fridge: Keep your No-Bake Biscoff Cheesecake Cups tightly covered in the refrigerator for up to 5 days. Make sure they stay chilled to preserve their creamy texture.
Freezer: For longer storage, these cheesecake cups can be frozen for up to 2 months. Just wrap them individually in plastic wrap and then place them in an airtight container.
Thawing: To enjoy, transfer frozen cups to the fridge and let them thaw overnight or for at least 4 hours. This ensures they return to their deliciously creamy state.
Reheating: There’s no need to reheat these cups; enjoy them cold as a delightful dessert treat!
What to Serve with No-Bake Biscoff Cheesecake Cups?
Treat your guests to a delightful experience that perfectly accompanies the creamy, sweet indulgence of these cheesecake cups.
-
Fresh Berries: The tartness of strawberries or blueberries adds a refreshing contrast to the sweet layers of your cheesecake cups. Their vibrant colors also create a beautiful presentation!
-
Whipped Cream: A dollop of freshly whipped cream brings an airy lightness and complements the flavors of the Biscoff without overshadowing them. It’s the perfect finishing touch!
-
Coffee or Espresso: Rich, warm coffee balances the sweetness of the cheesecake cups, enhancing the experience of this comforting dessert. Plus, the pairing of caffeine with dessert is always a crowd-pleaser!
-
Chocolate Dipped Biscuits: Serve alongside chocolate-dipped biscuits for an extra crunch and decadence. The added chocolate brings out the caramel notes in the Biscoff cookies, creating harmony in every bite.
-
Caramel Drizzle: Add a light caramel drizzle over the cheesecake cups or your fresh berries for an indulgent touch! The sticky sweetness elevates their flavor and adds an irresistible richness.
-
Mint Leaves: A sprinkle of fresh mint leaves brings brightness and an aromatic freshness that is surprisingly uplifting when paired with the creaminess of the cheesecake. Plus, they make for an elegant garnish!
Chef's Helpful Tips
- When making No-Bake Biscoff Cheesecake Cups, ensure that your cream cheese is well softened for a smooth filling; this helps avoid any lumps in your mixture.
- Be cautious when folding in the whipped cream, as over-mixing can deflate the airy texture you want to achieve.
- For the crust, it’s essential to press the cookie mixture firmly enough to create a stable base, but not so hard that it becomes rock solid.
- Allow the cheesecake cups to chill for a full four hours to ensure they set properly, and don’t skip the additional topping—those crushed Biscoff cookies add a delightful crunch.
No-Bake Biscoff Cheesecake Cups Recipe FAQs
What type of Biscoff cookies should I use?
Absolutely! For the best results, use classic Biscoff cookies, which provide that signature caramel flavor. If you prefer a crunchier texture, you might also try using Biscoff cookie bites or the crunchy Biscoff spread, but stick to full-size cookies for the crust layer.
How should I store the cheesecake cups?
To keep your No-Bake Biscoff Cheesecake Cups fresh, store them in the refrigerator, well-covered, for up to 5 days. This will help maintain their creamy texture and keep those delightful flavors intact. Storing them in an airtight container is ideal to prevent any moisture loss.
Can I freeze these cheesecake cups?
Very! You can definitely freeze your No-Bake Biscoff Cheesecake Cups. Just wrap them individually in plastic wrap, then place in an airtight container, and they’ll last up to 2 months in the freezer. When you’re ready to enjoy them, simply transfer the cups to the fridge to thaw for about 4 hours or overnight.
What should I do if my filling is too runny?
If you find that your cheesecake filling is too runny, it could be due to not whipping the cream sufficiently. Ensure your heavy cream is whipped to stiff peaks before folding it into the cheesecake mixture. If it’s still too runny, you can mix in a little extra powdered sugar or a touch of gelatin for increased firmness.
Are there any allergy considerations with this recipe?
Absolutely! Be mindful of the allergy potential with cream cheese and heavy cream, which can be problematic for those with dairy allergies. If you’re looking for dairy-free alternatives, consider using coconut cream and vegan cream cheese. Just remember to check that your Biscoff cookies are also dairy-free, as some brands may contain milk.
Do I need to use both Biscoff spread and cookies?
While it is highly recommended to use both, you could substitute one for the other if you’re looking for a lighter version. If you prefer fewer ingredients, you might just use the spread for flavor and skip the cookie crust entirely, layering the spread between whipped cream and maybe some chopped nuts or granola for added texture!
No-Bake Biscoff Cheesecake Cups
Ingredients
- 24 cookies Biscoff cookies Crushed
- 6 tablespoons Unsalted butter Melted
- 16 ounces Cream cheese Softened
- 1/2 cup Powdered sugar
- 1 teaspoon Vanilla extract
- 1 cup Heavy cream Whipped
- 1/2 cup Biscoff spread
- 4 cookies Extra Biscoff cookies Crushed
- Chocolate shavings or caramel sauce Optional
Method
- Crush the Biscoff cookies into fine crumbs.
- Add the melted butter to the cookie crumbs and mix until well combined.
- Spoon about 2 tablespoons of the cookie mixture into each cup and press down gently.
- Beat the softened cream cheese until smooth.
- Gradually add the powdered sugar and vanilla extract, mixing until fully combined.
- Whip the heavy cream until stiff peaks form.
- Gently fold the whipped cream into the cream cheese mixture, then fold in the Biscoff spread.
- Spoon the cheesecake filling over the cookie crust in each cup, filling about 3/4 full.
- Sprinkle another layer of crushed Biscoff cookies on top if desired.
- Cover and refrigerate for at least 4 hours.
- Before serving, top with additional crushed Biscoff cookies and drizzle with chocolate or caramel if desired.
- Serve chilled and enjoy!


Leave a Comment