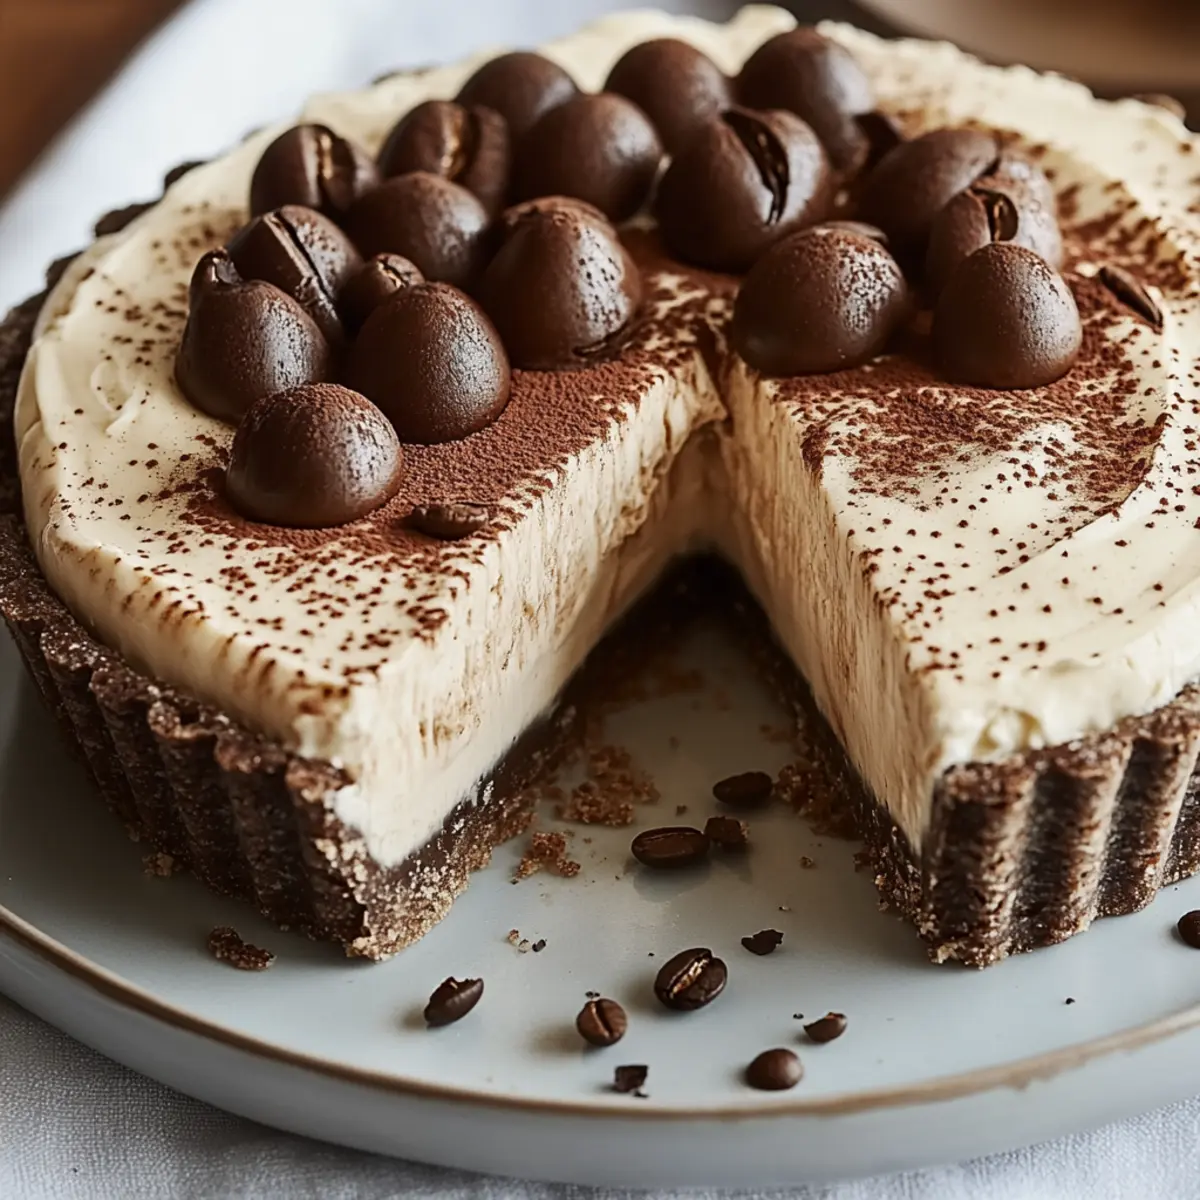
There’s something truly special about enveloping yourself in the comforting embrace of a rich dessert after a long day. Picture this: the delicate crunch of a cocoa-infused crust meets a silky layer of espresso mascarpone, creating a flavor harmony that dances on your palate. It’s those moments when indulgence becomes an art form that inspired me to craft this Espresso Mascarpone Tart.
During a rainy afternoon, with the scent of freshly brewed coffee wafting through my kitchen, I envisioned a dessert not just to savor, but to impress. This tart is a showstopper, perfect for gatherings or a quiet night in. With each bite, you’ll experience layers of sophistication combined with simplicity—yes, it looks fancy, but it comes together effortlessly, just the way we like our homemade treats.
So, if you’re weary of the same old dessert routine and hungry for something that brings a little spark back into your kitchen adventures, grab your apron. Let’s create something beautiful together!
Why You'll Love This Espresso Mascarpone Tart
- This Espresso Mascarpone Tart is incredibly easy to make, allowing you to whip it up without the hassle of complicated baking techniques.
- The deep flavors of espresso combined with the creamy mascarpone create a delightful taste experience that will leave everyone wanting more.
- This dessert is versatile enough to fit any occasion, whether it’s a cozy family dinner or a fancy gathering with friends.
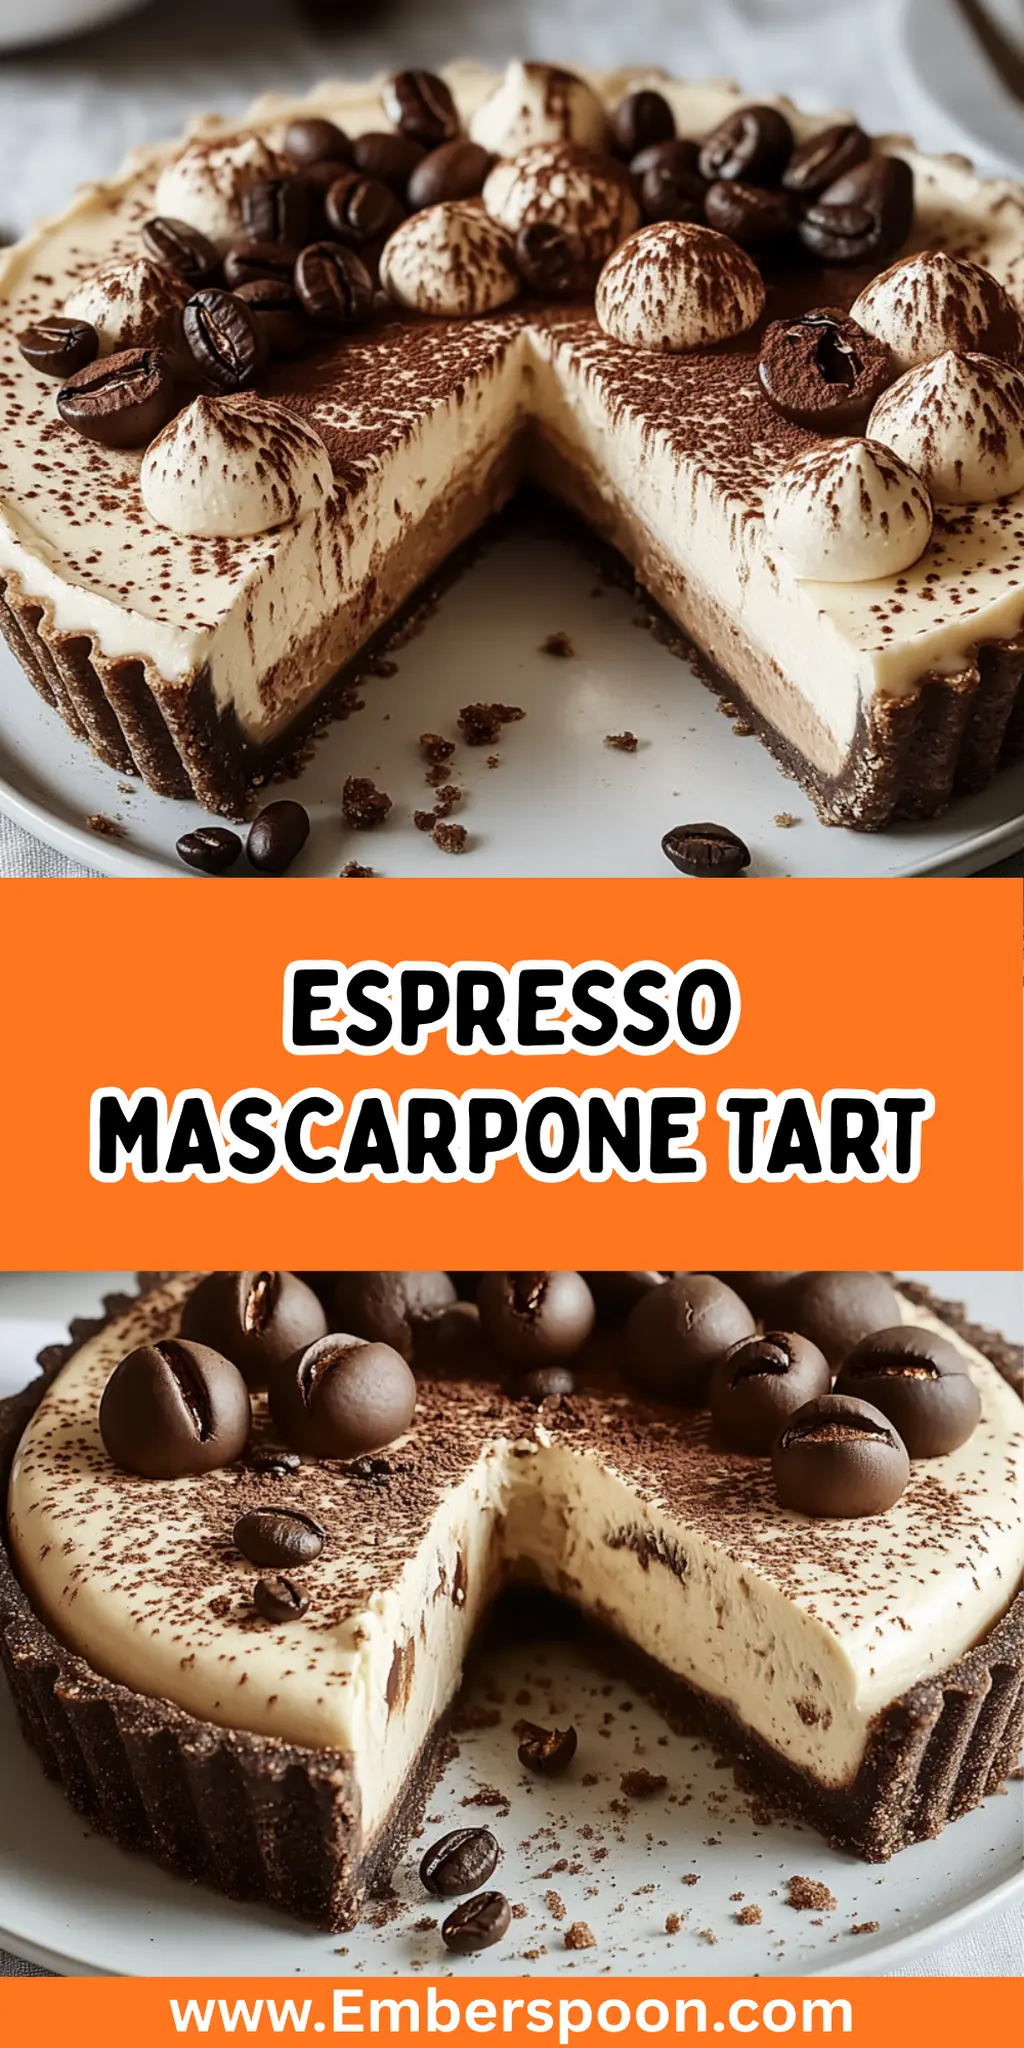
- Its stunning visual appeal, adorned with chocolate shavings and coffee beans, ensures it will be the centerpiece of your dessert table.
- You’ll also love how it can be made ahead of time, saving you precious moments when hosting guests.
- Prepare to impress with a dessert that is both sophisticated and crowd-pleasing!
Espresso Mascarpone Tart Ingredients
For the Tart Crust
- All-purpose flour – a classic base that provides structure; sift for a lighter texture.
- Unsweetened cocoa powder – adds a deep chocolate flavor that perfectly complements the espresso.
- Powdered sugar – sweetens the crust while maintaining a tender texture.
- Salt – enhances the flavors of the other ingredients, balancing sweetness.
- Unsalted butter (chilled and cubed) – ensures a flaky crust; chilling helps control the melting time.
- Large egg yolk – binds the crust ingredients together, adding richness.
- Cold water – use just enough to bring the dough together, preventing dryness.
For the Espresso Mascarpone Filling
- Mascarpone cheese – provides a luxurious creaminess that is quintessential to this tart.
- Heavy cream – whipped to soft peaks, it lightens the filling’s texture beautifully.
- Powdered sugar – sweetens the filling without adding grittiness.
- Espresso (cooled) – infuses the tart with a robust coffee flavor; brew a strong cup for intense taste.
- Vanilla extract – adds depth and complements the espresso wonderfully.
- Coffee liqueur (optional) – enhances the coffee flavor; use for an adult twist.
For Decoration
- Cocoa powder – for dusting, it adds an elegant finishing touch.
- Chocolate shavings (optional) – enhance aesthetics and provide a delightful bite of chocolate.
- Coffee beans (for decoration, optional) – use whole beans on top for an eye-catching detail that hints at the flavors within.
Each component of this Espresso Mascarpone Tart is crafted with love, promising to not only satisfy your sweet tooth but also elevate your dessert game!
How to Make Espresso Mascarpone Tart
-
Preheat your oven to 350°F (175°C). This step gets the oven ready for a perfectly baked tart crust that will be flaky and delicious.
-
Combine the all-purpose flour, cocoa powder, powdered sugar, and salt in a mixing bowl. Stir them together until well-blended, creating a harmonious dry base for your crust.
-
Add the chilled, cubed butter to the dry ingredients. Use a pastry cutter or your fingers to mix until the mixture resembles coarse crumbs, signaling that your crust is taking shape.
-
Stir in the egg yolk and add cold water, one tablespoon at a time. Mix until the dough clumps together, ensuring it remains moist but not sticky—aim for a manageable dough consistency.
-
Press the dough into a tart pan, evenly covering the bottom and sides. Prick the bottom with a fork to prevent bubbling during baking, allowing for even cooking.
-
Bake in the preheated oven for 15-20 minutes or until set. Remove from the oven and let cool completely, giving you that perfect base for the creamy filling.
-
Whip the heavy cream in a mixing bowl until soft peaks form. This step is crucial for incorporating lightness into your dessert, ensuring a fluffy texture.
-
Combine the mascarpone cheese, powdered sugar, espresso, vanilla extract, and coffee liqueur (if using) in another bowl. Mix until smooth, creating a silky filling that marries the flavors beautifully.
-
Fold the whipped cream into the mascarpone mixture gently until fully incorporated. This mixes the ingredients without deflating the cream’s airy texture.
-
Pour the espresso mascarpone filling into the cooled tart crust, smoothing the top with a spatula. Make sure to spread it evenly for a stunning finish.
-
Refrigerate the tart for at least 2 hours to allow it to set. This chilling period enhances the flavors and allows the filling to firm up beautifully.
-
Dust the top with cocoa powder and add chocolate shavings and coffee beans for decoration, if desired. This final touch elevates the presentation of your tart.
-
Slice and serve your Espresso Mascarpone Tart chilled. Enjoy the sumptuous blend of flavors with each delicious bite!
Optional: Sprinkle with extra cocoa powder for an elegant touch.
Exact quantities are listed in the recipe card below.
What to Serve with Espresso Mascarpone Tart?
There’s nothing quite like an enchanting dessert combined with delightful sides to elevate your dining experience.
-
Rich Vanilla Ice Cream: This sweet, creamy complement enhances the tart’s coffee and chocolate notes, creating a perfect balance of textures.
-
Fresh Berries: Raspberries or strawberries add a burst of freshness that cuts through the rich flavors, providing a lovely contrast that elevates each bite.
-
Chocolate Espresso Coffee: Sip on this luxurious drink for a complete coffee experience. The deep flavors enhance the tart’s espresso elements without overwhelming the palate.
-
Whipped Cream Clouds: A dollop of lightly sweetened whipped cream adds an airy touch, beautifully offsetting the denser filling while visually enhancing your plate.
-
Hazelnut Biscotti: Crunchy and nutty, these cookies provide a satisfying crunch and a hint of crunch, making each bite of tart even more delightful.
-
Toasty Almond Slices: Sprinkle these on top or serve alongside to add a nutty flavor and a pleasant crunch that pairs harmoniously with the creamy filling.
-
Mocha Affogato: Pouring a hot espresso over a scoop of vanilla ice cream creates a dreamy mocha treat, echoing the tart’s flavors and adding warmth to each serving.
-
Spicy Dark Chocolate Bark: The rich bitterness of dark chocolate infused with a touch of spice complements the tart nicely, adding a layer of flavor intrigue with every bite.
Crafting the perfect meal around your Espresso Mascarpone Tart not only satisfies the sweet tooth but also creates a memorable experience for your guests.
Make Ahead Options
These Espresso Mascarpone Tarts are perfect for busy home cooks looking to save time without sacrificing taste! You can prepare the tart crust up to 24 hours in advance by following the baking instructions and then storing it in an airtight container at room temperature; this keeps it fresh and ready for the filling. The mascarpone filling can be made up to 3 days ahead and stored in the refrigerator—just give it a gentle stir before pouring into the crust. When you’re ready to serve, simply pour the chilled filling into the crust, refrigerate for at least 2 hours to set, and finish with cocoa powder and decorations for a stunning presentation. Enjoy deliciously effortless moments with your loved ones!
How to Store and Freeze Espresso Mascarpone Tart
Fridge: Keep your Espresso Mascarpone Tart covered with plastic wrap or in an airtight container in the fridge for up to 3 days. This ensures it stays fresh and delicious.
Freezer: If you want to store it longer, freeze the tart (unadorned) for up to 2 months. Wrap it tightly in plastic wrap and aluminum foil to prevent freezer burn.
Thawing: To enjoy your frozen tart, simply transfer it to the fridge for several hours or overnight. This allows it to thaw gently while preserving its delightful texture.
Reheating: Serve the tart chilled for the best flavor experience. If you prefer it slightly softened, let it sit at room temperature for about 30 minutes before slicing.
Espresso Mascarpone Tart Variations
Feel free to explore these delightful twists and substitutions to make your Espresso Mascarpone Tart truly your own!
-
Gluten-Free: Substitute all-purpose flour with a gluten-free flour blend for a fluffy, delicious tart that everyone can enjoy.
-
Dairy-Free: Use coconut cream and vegan butter to create a luscious filling and crust without dairy. The coconut flavor adds a delightful touch!
-
Nutty Flavor: Incorporate almond or hazelnut flour in place of some of the all-purpose flour for a unique taste. This will provide a subtle, nutty richness to your crust.
-
Sweet Twist: Replace powdered sugar in the filling with honey or maple syrup for a natural sweetness. These alternatives will lend a warm, complex flavor to the tart.
-
Chocolate Lava: Add a layer of melted dark chocolate to the tart crust before pouring in the mascarpone filling for an indulgent chocolate surprise with each slice.
-
Spicy Kick: Mix a pinch of cinnamon or cayenne pepper into the mascarpone filling for a warming sensation that contrasts beautifully with the espresso notes.
-
Fruit Fusion: Top your finished tart with fresh berries or sliced bananas for an added layer of freshness and a pop of color; it complements the richness wonderfully.
-
Decaf Delight: If you prefer a milder flavor, use decaffeinated espresso for the filling without losing that signature coffee taste. Enjoy it any time of day without the jitters!
Chef's Helpful Tips
- When making your Espresso Mascarpone Tart, make sure your butter is well chilled to achieve a flaky crust texture; this prevents it from melting before baking.
- Avoid overworking the dough when adding the egg yolk and water; mixing just until combined ensures a tender bite.
- For a creamier filling, thoroughly incorporate the mascarpone cheese at room temperature before adding the espresso and other ingredients.
- Remember to chill the tart for at least 2 hours to help it set properly and allow the flavors to meld beautifully.
Espresso Mascarpone Tart Recipe FAQs
How do I select ripe ingredients for my Espresso Mascarpone Tart?
Absolutely! For the best flavor, make sure your mascarpone cheese is fresh; it should be smooth and creamy, not grainy. Always check the expiration date on the package. For the best espresso flavor, use freshly brewed espresso made from quality coffee beans. If you’re using coffee liqueur, opt for a brand you enjoy the flavor of since it will enhance your tart.
What is the best way to store my Espresso Mascarpone Tart?
Very! You can keep your Espresso Mascarpone Tart covered with plastic wrap or in an airtight container in the fridge for up to 3 days. This keeps it fresh and maintains its creamy texture. If you have any leftovers, it’s best to ensure it’s well-sealed to prevent absorbing any other odors from the fridge.
Can I freeze my Espresso Mascarpone Tart?
Definitely! To freeze the tart, I recommend wrapping it tightly in plastic wrap followed by aluminum foil to prevent freezer burn. You can freeze it (unadorned) for up to 2 months. Just make sure to let it cool completely before wrapping it up. When you’re ready to enjoy it, simply transfer it to the fridge to thaw overnight.
What should I do if my tart crust is too crumbly?
No worries! If your tart crust is too crumbly, it may need a bit more moisture. You can add an extra teaspoon of cold water and gently mix it in. Be cautious not to overwork the dough as that can lead to a tough crust. Always aim for a dough that holds together when gently pressed.
Is this Espresso Mascarpone Tart suitable for people with allergies?
Great question! This tart contains dairy and gluten, so it may not be suitable for those with dairy or gluten allergies. If needed, you can substitute gluten-free flour for the all-purpose flour and use a dairy-free mascarpone alternative available in supermarkets. Always check ingredient labels to ensure they meet your dietary needs and preferences.
How long should I chill the tart before serving?
Absolutely essential! You should refrigerate your Espresso Mascarpone Tart for at least 2 hours before serving. This chilling period allows the filling to set properly, enhancing the flavors and making it easier to slice. If you’re short on time, even 1 hour can help, but the longer, the better for a delightful experience.
Espresso Mascarpone Tart
Ingredients
- 1 cup all-purpose flour sifted
- 1/4 cup unsweetened cocoa powder
- 1/4 cup powdered sugar
- 1/4 teaspoon salt
- 1/2 cup unsalted butter chilled and cubed
- 1 large egg yolk
- 1-2 tablespoons cold water as needed
- 1 cup mascarpone cheese
- 1 cup heavy cream whipped to soft peaks
- 1/4 cup powdered sugar
- 1/2 cup espresso cooled
- 1 teaspoon vanilla extract
- 2 tablespoons coffee liqueur optional
- 1 tablespoon cocoa powder for dusting
- 1/4 cup chocolate shavings optional
- a few coffee beans for decoration, optional
Method
- Preheat your oven to 350°F (175°C).
- Combine flour, cocoa powder, powdered sugar, and salt in a bowl.
- Add chilled butter, mixing until coarse crumbs form.
- Stir in egg yolk and cold water until dough clumps together.
- Press dough into a tart pan, prick with a fork, and bake for 15-20 minutes.
- Let the crust cool completely.
- Whip heavy cream until soft peaks form.
- Combine mascarpone, powdered sugar, cooled espresso, vanilla, and coffee liqueur until smooth.
- Fold whipped cream into mascarpone mixture gently.
- Pour filling into cooled tart crust and smooth the top.
- Refrigerate for at least 2 hours to set.
- Dust with cocoa powder and add chocolate shavings and coffee beans, if desired.
- Slice and serve chilled.

Leave a Comment